Writing a Check with a Personal Message: A Step-by-Step Guide
While digital payments have become increasingly popular, there are still instances where writing a check is necessary or preferred. Whether it's paying rent, sending a gift, or making a purchase, writing a check with a personal message can add a touch of thoughtfulness and gratitude to the transaction. In this article, we'll walk you through the process of writing a check with a personal message, including the necessary steps and tips to avoid common mistakes.
Writing a check with a personal message is not only a thoughtful gesture, but it also serves as a reminder of the importance of handwritten communication. In today's digital age, it's easy to overlook the value of a personal touch, but a handwritten message on a check can make a significant difference in the recipient's experience.
Key Takeaways
- You need to write the date, recipient's name, and dollar amount in the designated spots when paying with a check.
- When you sign your check, make sure the signature matches the name written on the check.
- A personal message can be added to the memo line to provide context or a reason for the payment.
- Make sure to keep a record of the payment, including the check number, date, and amount.
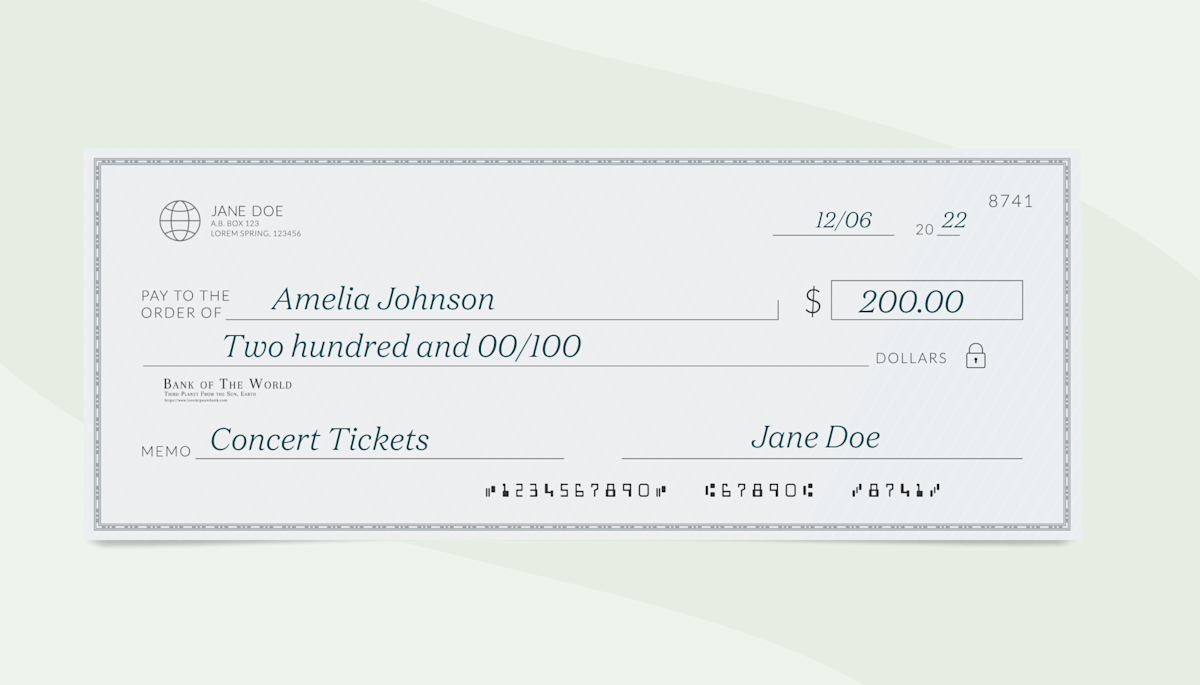
The first step in writing a check is to date it. The date should be written in the top right corner of the check, and it should be the current date. This date serves as the reference point for the payment, and it's essential to use the correct date to avoid any discrepancies or issues.
Step 2: Writing the Payee's Name
Next, you need to write the payee's name in the "Pay" field. This is the field where you write the name of the person or business receiving the payment. Make sure to spell the name correctly and use the correct title (e.g., Mr., Mrs., Dr., etc.).
The amount of the payment should be written in both numerical and written form. The numerical amount should be written on the left side of the check, and the written form should be written on the line beneath it. For example, if you're paying $100, you would write "100" on the left side and "One Hundred Dollars" on the line beneath.
This particular example perfectly highlights why Writing A Check With A Personal Message is so captivating.
Step 4: Adding a Memo (Optional)
A personal message can be added to the memo line to provide context or a reason for the payment. This is an optional step, but it can be a thoughtful gesture to include a message or a thank-you note.
Step 5: Signing the Check
The final step is to sign the check. The signature should match the name written on the check, and it should be signed in the bottom right corner of the check. Make sure to sign the check with a pen, as a signature written in pencil may not be accepted.
Conclusion
Writing a check with a personal message is a thoughtful gesture that can add a touch of warmth and gratitude to the transaction. By following the steps outlined in this article, you can write a check with a personal message that is both professional and personal. Remember to always keep a record of the payment and to sign the check with a pen to ensure that it is accepted.
Additional Tips
- Make sure to use a pen that is easy to read and won't smudge or fade over time.
- Use a check that is specifically designed for personal use, and avoid using business checks for personal payments.
- Consider adding a return address to the check, in case it needs to be returned or reimbursed.
- Keep a record of all your payments, including checks, to track your expenses and avoid any discrepancies or issues.
Here's an example of a check with a personal message:
January 10, 2023
John Doe
Anytown, CA 12345
Pay to the order of:
Emily Chen
$100.00
One Hundred Dollars
Signature:


:max_bytes(150000):strip_icc()/how-to-write-cents-on-a-check-315355-final-5be57b294a9044788686c3f54cc35d2d.jpg "Write In Private: Free Online Diary And Personal Journal | Penzu")


 - wikiHow")

