Setup Internet Router with Network Settings: A Comprehensive Guide
Your router is the backbone of your home network, and configuring it properly is essential to ensure a seamless online experience. In this article, we'll take you through the step-by-step process of setting up your internet router with network settings, from connecting cables to configuring advanced options.
Why Configure Your Router's Network Settings?
There are many reasons you might need to access your router's settings, from changing the Wi-Fi network name (SSID) or password to updating admin credentials to adjusting channels for better performance. With the increasing importance of home networks, router interfaces have become more user-friendly, and many major brands offer mobile apps for easier management.
Step 1: Connect Your Router to the Modem and Power Source
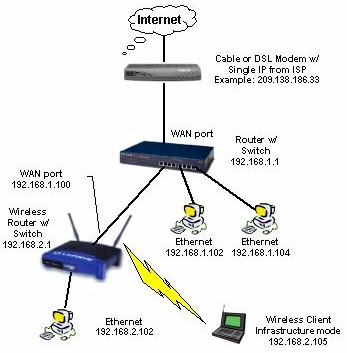
The first step in setting up your router is to connect it to the modem and power source. Make sure the modem is turned on and the power cord is securely plugged into the router. Next, connect the router to the modem using an Ethernet cable. This will establish a connection between the modem and the router, allowing you to configure the network settings.
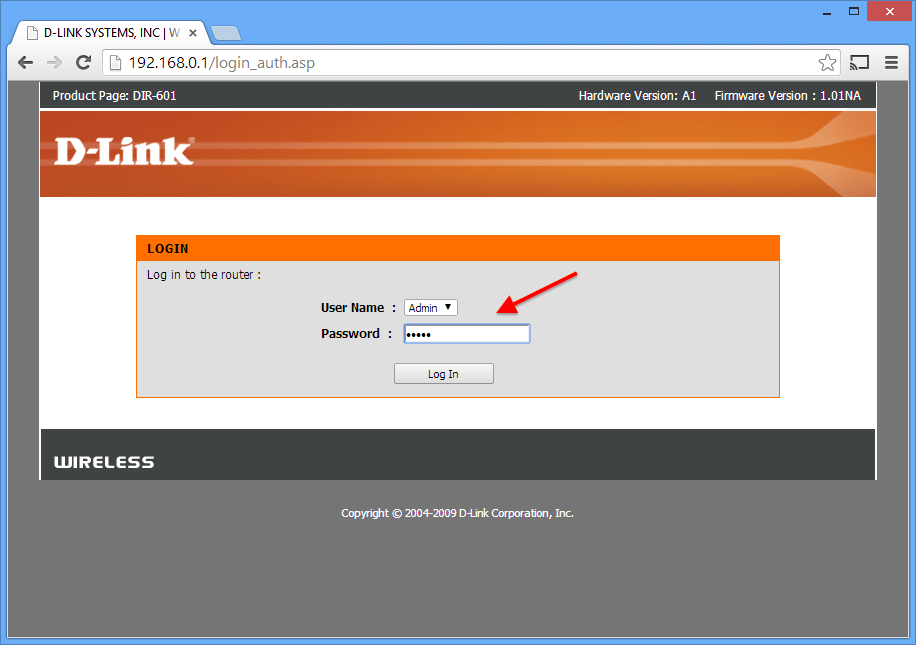
Step 2: Access the Router's Web Interface
On the router's web interface, navigate to the Wi-Fi settings section. Here, you can change the Wi-Fi network name (SSID), password, and encryption settings. Make sure to use a strong password and encryption method to secure your network.
Under the Wi-Fi settings section, you'll find the network name (SSID) and password fields. Change the network name to a unique name that identifies your network, and enter a strong password to secure it. You can also change the encryption method to WPA2 or WPA3, depending on your router's capabilities.
This particular example perfectly highlights why Setup Internet Router With Network Settings is so captivating.
Configure the Firewall Settings
Once you've configured the network settings, it's essential to test them to ensure they're working correctly. You can use tools like ping, traceroute, and ipconfig to test the network settings and troubleshoot any issues.
Setting up your internet router with network settings may seem daunting, but with this guide, you'll be able to configure your router properly and ensure a seamless online experience. Remember to change the network name, password, and encryption settings to secure your network, and configure the DHCP and firewall settings to control network traffic. With these steps, you'll be able to enjoy a fast and secure home network.
A guest network is a separate access point created on your router specifically for visitors. It allows guests to connect to the internet using a different network name (SSID) and password than your main home network.
How to Set Up a Guest Network
To set up a guest network, follow these steps:
Connecting to a Wireless Network
Look for the network name (SSID) of your home network in the list of available wireless networks. Make sure you have the correct password to access the network.
Managing your network settings is crucial to ensuring a seamless online experience. Follow these steps to manage your network settings:
Step 2: Configure the Network Settings
Navigate to the network settings section on the router's web interface. Here, you can configure the network name, password, encryption settings, DHCP settings, and firewall settings.
Step 3: Save the Changes
Once you've made the necessary changes, save them to ensure they take effect. Make sure to restart the router to apply the changes.
Setting up and managing your network settings is essential to ensuring a seamless online experience. Follow the steps outlined in this guide to configure your router's network settings and manage your network. Remember to change the network name, password, and encryption settings to secure your network, and configure the DHCP and firewall settings to control network traffic. With these steps, you'll be able to enjoy a fast and secure home network.

 - HP")
")


 - LazyAdmin")


![[Wireless Router] How do I enter my ASUS router's setting page using ...](https://robots.net/wp-content/uploads/2023/09/how-setup-dlink-wireless-router-1696072588.jpg "[Wireless Router] How do I enter my ASUS router's setting page using ...")

