Discover the Ultimate Guide to Taking Screenshot on Mac: A Step-by-Step Tutorial
Are you a Mac user looking for a straightforward guide on how to take a screenshot on your Mac? Look no further! Taking a screenshot on Mac is a simple process, and with the right tools and techniques, you'll be capturing your screen in no time. In this article, we'll explore the different ways to take a screenshot on Mac, from using keyboard shortcuts to utilizing the built-in Screenshot app.
Method 1: Taking a Full-Screen Screenshot on Mac
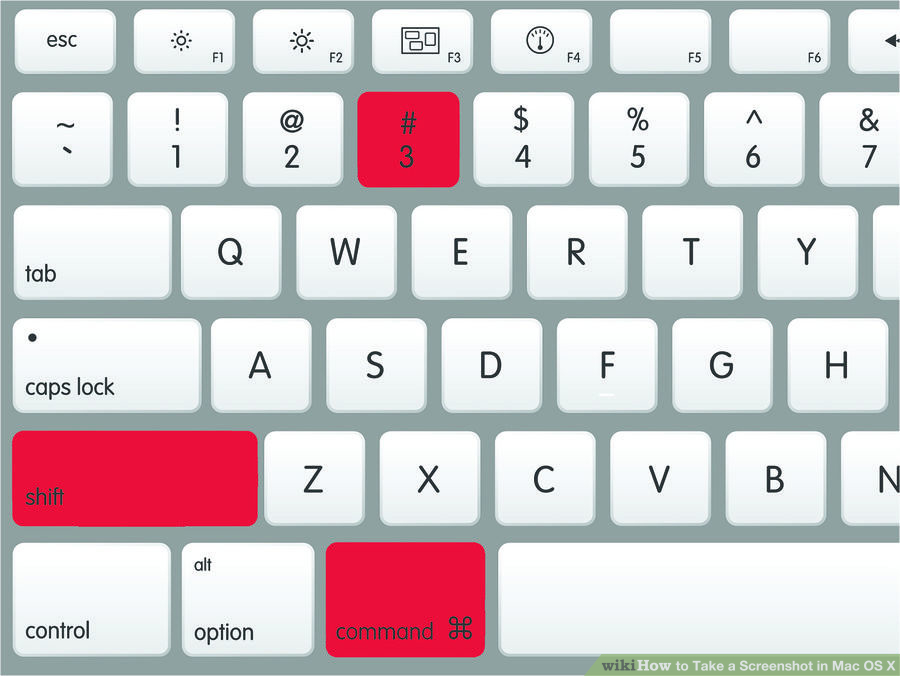
One of the most common ways to take a screenshot on Mac is by using the keyboard shortcut Command + Shift + 3. This will capture your entire screen, including the Dock, top menu bar, and everything else. Press and hold these keys together for 1 second, and your Mac will automatically save the screenshot as a PNG file on your desktop.
Method 2: Taking a Portion of the Screen
If you want to capture only a specific area of the screen, you can use Shift + Command + 4. This will activate the crosshair cursor, allowing you to select the desired area to capture. Click and drag the crosshair to select the area, release the mouse button or trackpad to capture the screenshot.
Method 3: Capturing a Window or Menu
Method 4: Using the Screenshot App
If you prefer to use the built-in Screenshot app, you can launch it from the Launchpad or Spotlight search. The Screenshot app will allow you to capture your screen, record your screen, and even edit screenshots. You can also use the Window or Menu option to capture specific windows or menus.
Taking Screenshots with Keystrokes
Using keystrokes is the quickest way to take a screenshot on Mac. Here are the common keystrokes you can use:
Command + Shift + 3: Takes a full-screen screenshotShift + Command + 4: Selects an area of the screen to captureShift + Command + 4 + Space: Captures a specific window or menu
Taking Screen Recordings on Mac
Such details provide a deeper understanding and appreciation for Taking Screenshot On Mac.
Want to record your screen instead of taking a screenshot? You can use the Screenshot app or the keyboard shortcut Command + Shift + 5. This will launch the Screen Recording window, where you can select the section of the screen to record and adjust settings like microphone input and timer delay.
Where to Find Your Screenshots
By default, your Mac saves screenshots to the desktop as PNG files. You can also find your screenshots in the Screenshots folder in your user account's Pictures folder.
Conclusion
Taking a screenshot on Mac is a straightforward process, and with the right tools and techniques, you'll be capturing your screen in no time. Whether you prefer using keyboard shortcuts or the Screenshot app, this guide has covered the essential methods to take a screenshot on Mac. Practice these methods, and you'll become a pro at taking screenshots in no time!

: Complete Methods & Tips")


